

Browser Development Tools Responsive Design Chrome
Browser developer tools offer us the ability to develop and debug our clients' websites. They are built into most browsers such as Chrome, Firefox, Edge, and Safari, and offer a unique insight into how a page came to be.
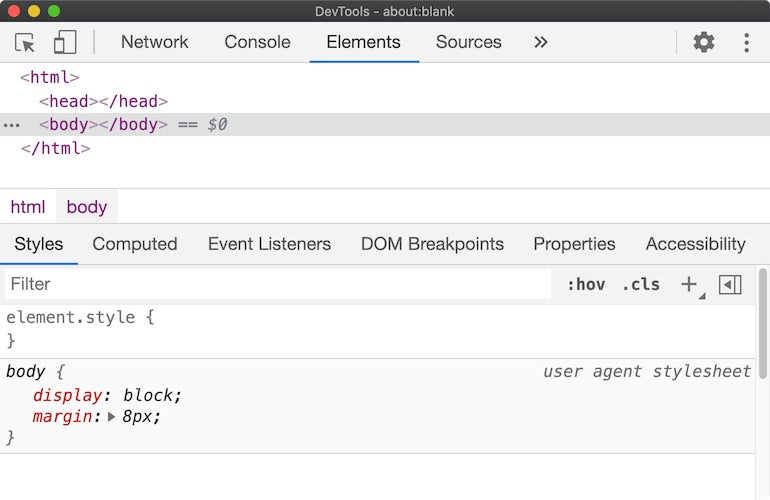
With the developer tools open, you can navigate through the different panels, change styles, debug JavaScript, and more. One of the more common use cases of developer tools is to inspect an element, and change a CSS style, such as the font size. As you make changes to the styles, you'll see those changes appear in real-time within the page.
"With the developer tools open, you can navigate through the different panels, change styles, debug JavaScript, and more."
There's a common theme you might be familiar with, however. As the tools are constantly being improved, it can be tricky to stay on top of changes and understand how to incorporate such features into our workflows.
In this article, I'll present some relatively modern features of Chrome Developer Tools (also known as DevTools) which you can start using today. We'll cover features which approach web development from different angles, such as performance, debugging, and accessibility.
As a side note, while all browser developer tools have made fantastic improvements over the years, I'll focus on Chrome as it's my personal go-to choice for website development and it's very popular!
We'll cover:
- A brief Chrome Developer Tools introduction
- The Performance Monitor
- The Media panel
- Vision loss emulation
- The Code Coverage panel
- A recap and conclusion

Grow Volume 2: Becoming a Full-Stack Web Design Freelancer
Get your free copy of Grow Volume 2: Becoming a Full-Stack Web Design Freelancer sent to your inbox.
By entering your email - we'll also send you marketing emails related to Shopify. You can unsubscribe anytime. Note: the guide won't be delivered to role-based emails, like info@, developer@, etc.
Chrome Developer Tools: A brief introduction
Firstly, here's a quick refresher on how you would typically use Chrome Developer Tools. You would:
- Open up a webpage in Google Chrome
- Use the keyboard shortcut Cmd + Alt + I / Ctrl + Shift + I (or right click within the page and select Inspect element)
At this point, you can continue to inspect the elements on the page, and observe how the styles within the Styles Pane update. Note: the Styles Pane is part of the Elements panel and is labelled Styles.
With that out of the way, let's cover a few useful features you'll find in Chrome Developer Tools (tested with version 86).
1. Performance Monitor
It's easy to get hung up on workflow-based features, but it's worth remembering that sometimes these features help us as developers more than they help the user. The Performance Monitor, however, is primarily focused on metrics which do impact the user and their experience in using the website.
In fact, you can't get some of these metrics elsewhere: you won't find them in your code editor! Therefore, the Performance Monitor is certainly worth using, or at least worth learning about.
The Performance Monitor is a visualization of various front end performance metrics. Before we continue, here's how to open it up:
- Search for Performance Monitor in the Command Menu (Cmd + Shift + P / Ctrl + Shift + P to open the Command Menu)
- Select the option titled Performance Monitor
- Interact with the page by performing actions such as scrolling, navigating, clicking around, etc.
By following those steps, you should notice various metrics change over time.
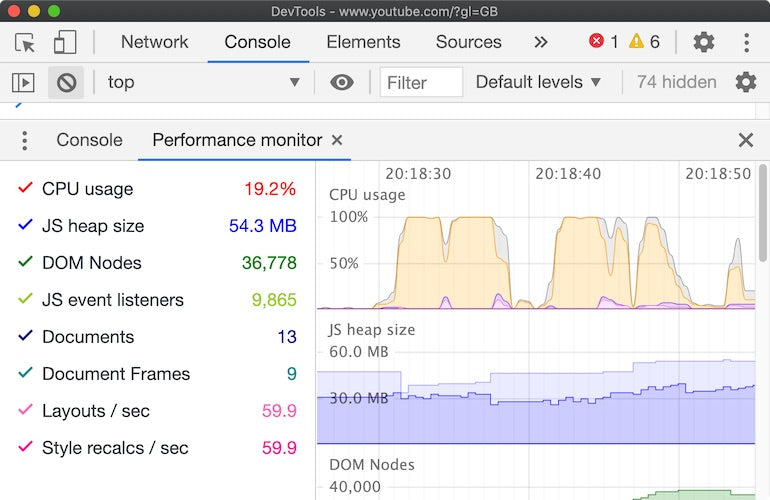
To give you an example, as part of the Shopify editorial process, I'm typing this article into Google Docs in my web browser. As I type, the Performance Monitor shows that the CPU usage fluctuates. When I stop typing, it drops to near zero percent. Interestingly, JavaScript memory usage (labelled as JS Heap Size within Chrome Developer Tools) remains high, yet fairly static throughout the writing process.
Bonus Tip: Creating event listeners in JavaScript, amongst many other operations, will consume memory (typically known as RAM). The more memory your JavaScript consumes, the less memory that will be available to other tabs, and even other operating system applications.
The Performance Monitor is especially powerful in that it persists throughout page navigation. This means, given a common website use case, such as a shopping cart checkout or user registration, you can ask questions like these:
- How does CPU usage fluctuate when the customer purchases an item on our client's website?
- As JavaScript memory spikes when filling in our client's forms, how does it affect other browser tabs which the customer might occasionally be going to?
As a reminder, fluctuating metrics, or even high values for those metrics, do not always correlate with poor UX. While the Performance Monitor is great for a high level overview of the page, you'll want to use more advanced performance profiling tools to determine the effects of such metrics. Such tools include the Chrome Developer Tools Performance panel and the Chrome Developer Tools Profiler.
Looking at the Performance Monitor, you'll notice metrics like the following:
- CPU Usage
- JS Heap Size
- DOM Nodes
- JS Event Listeners
- Documents
- Document Frames
- Layouts per second
- Style recalculations per second
Ultimately, the metrics alone won't be enough to fix a problem. Chrome Developer Tools will inform you what is happening, but it's for you to figure out why, and then create a fix!
You might also like: The 10 Most Useful Browser Dev Tools for Front End Developers.
2. Media panel
The Media panel is one of those features which you could go most days without using, but it's still helpful to know it exists for when you do need it.
The Media panel supports inspecting media, such as video, on the current page. To try it out:
- Visit a webpage with embedded media, such as a YouTube video page
- Select Show Media from the Chrome Developer Tools Command Menu (Cmd + Shift + P / Control + Shift + P)
- Inspect the details presented within the Media panel
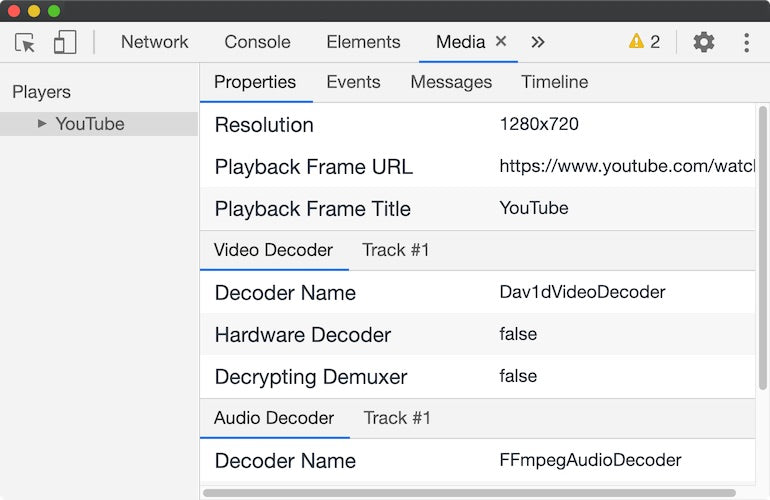
If a .MP4 video is being played in a webpage, for example, you can view the following tabs within the overall panel:
- Properties: Selected properties which can provide useful diagnostics
- Events: Internal media processing events which fired, including their payload
- Messages: Relevant media processing messages
- Timeline: A visualisation to understand how the media state changed over time
Unless you are doing deep debugging, the data shown in the Properties pane will be enough to answer your questions, such as:
- What is the file size of the video?
- What is the resolution of the video?
- What is the duration of the video?
- Is this video originating from the same source as the target website?
- Is hardware decoding being used?
These questions can be extra useful when you're debugging a video with a custom video player.
High level pieces of information like these should be enough for most people, but if you need more detail, the Events pane can give you much more granular information, such as the internal video event which triggered during the lifecycle of the video. For example kBufferingStateChanged, is an event described as: "...a change to the buffering state of the video caused by either network slowness or decoding slowness."
Media debugging surfaces helpful information which was traditionally hidden away within the Chrome internals. Next time you're watching a video, open up the Media panel to see what properties your media has.
You might also like: The 20 Best Visual Studio Code Extensions for Front End Developers.
3. Vision loss emulation
Accessibility tooling has existed in Chrome Developer Tools for a while, but now it's even more robust.
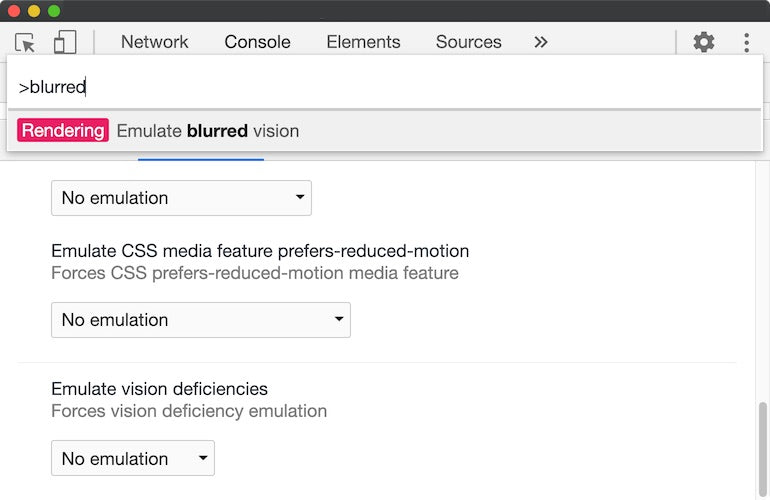
You can emulate the effects of vision loss on your client's website to improve the user experience and ensure that it's inclusive and usable by as many people as possible. One example is blurred vision, and there is an option to emulate it from within Chrome Developer Tools.
To emulate blurred vision, do the following:
- Select Emulate blurred vision from the Chrome Developer Tools Command Menu (Cmd + Shift + P / Ctrl + Shift + P)
- Observe that the page now appears blurry
- Remove the blurred vision effect by selecting Do not emulate any vision deficiencies from the Chrome Developer Tools Command Menu
If you want to view all the available vision loss emulations , follow these steps:
- Select Show rendering from the Chrome Developer Tools Command Menu
- Select the dropdown box under the section titled Emulate vision deficiencies
- Select a deficiency and observe that the page updates with the selected effect
Some of the options include:
- Blurred vision
- Protanopia
- Deuteranopia
How you use this feature depends on your client's use case, website, audience, internal requirements, and in some cases, even legal requirements. It's possible that no changes are needed based on what you see from the emulations applied to your client's website. But, it's important to be aware that this feature exists and to understand how to use it.
You might also like: What's New in HTML: 6 Native Elements You Can Use Today.
4. Code Coverage panel

The code coverage feature in Chrome Developer Tools can inform you as to which parts of your code are unused. However, before continuing, it's worth understanding what you're quantifying, i.e., at which point does the code count as unused?
For example: JavaScript, which is set to execute after the load event, will report as being unused before the load event. This sounds obvious, but it's something to keep in mind. Unused code is not always a bad thing, since it depends on when you stopped recording and what the intentions are.
"Unused code is not always a bad thing, since it depends on when you stopped recording and what the intentions are."
Let's take a brief look at code which would be considered partially unused:
In the code example above, observe how the main.js file only requires one out of the two exported functions from animals.js. The function dog(), is essentially unused code, and it's this which the code coverage feature of Chrome Developer Tools can bring to our attention.
With that out of the way, here's how to use the code coverage tool:
- Select Show coverage from the Chrome Developer Tools Command Menu
- Select the button labelled Start instrumenting coverage and reload the page
- Observe code coverage statistics in the panel
You'll find the following information in a code coverage recording:
- URL: A URL to the resource
- Type: Type of resource, e.g. CSS or JavaScript
- Total Bytes: The total size of the resource
- Unused Bytes: The unused size of the resource
- Usage Visualization: A visual representation of the used versus unused bytes of the resource
In addition, you can click on a resource to view the exact lines of code which were unused.
Grow your business with the Shopify Partner Program
Whether you offer marketing, customization, or web design and development services, the Shopify Partner Program will set you up for success. Join for free and access revenue share opportunities, tools to grow your business, and a passionate commerce community.
Sign up
The tip of the Chrome Developer Tools iceberg
In this article, we covered the following. You can:
- Use the Performance Monitor to identify potential performance bottlenecks within your client's webpage(s) and what the various metrics represent.
- Inspect media with the Media panel. We observed the sort of information the Media panel displays with an embedded video.
- Improve accessibility by using the Emulate vision deficiencies feature in Chrome Developer Tools.
- Find out how much unused CSS and JavaScript there is with the Code Coverage feature.
All of the features we covered in this article can be accessed from the Chrome Developer Tools Command Menu (Cmd + Shift + P / Ctrl + Shift + P). It features fuzzy search, so if you forget the full name is "Performance monitor", you can type in "Performance" and scroll through the list of possible options until you find it.
Chrome Developer Tools has a heap of features which can highlight potential performance bottlenecks in your client's webpage. We covered a small subset of features, but it's worth noting that Chrome Developer Tools includes many more panels which can assist you on your development and debugging journey.
Watch this space! Chrome Developer Tools is bringing more to the table, from CSS Grid Inspection, to a new version of Lighthouse. If you want to live on the edge and experiment with new features, you can give Chrome Canary a try.
What is your favorite Chrome developer tools feature? Let us know in the comments below.
Browser Development Tools Responsive Design Chrome
Source: https://www.shopify.com/partners/blog/chrome-developer-tools
Posted by: huttonandless00.blogspot.com
0 Response to "Browser Development Tools Responsive Design Chrome"
Post a Comment